Sunday, May 26, 2019

7.5 x 7.5 Mini Album

Hello everyone!!!  Today I am sharing with you a mini album that I created that has multiple flip pages and pockets and can hold more than 50 pictures.  Each page features a side pocket with an insert that you can add pictures to as well.  It is a total of 8 pages plus the insides of the front and back covers can also be used for more pictures. The album cover has been covered in fabric.  This one-of-a kind album is for sale.
Here is the album.

The inside pages.

Inside front cover is a pocket that you can insert pictures using the picture insert shown.

First page front - flip pages open up  - pocket inside for add more pictures. 

Back of first page - has double pockets with inserts for pictures.

Second page front - has a double left flip page and a double right flip page

 Back of second page - flips open at the top and at the bottom with left and right flip pages inside.

Upper and lower flip pages open up to reveal left and right flip pages for the second page back.

Front of the third page - Flip page on the left has a pocket for a picture insert.  When the flip page is open there is another pocket on the right side with another picture insert.

Back of page 3 - left and right flip pages open up and you have an envelope flip booklet.

This is the envelope opened.  Pages in the middle flip up for more pictures.


Front of page 4 - Angled left and right flip pages are also pockets and they open up to reveal a pocket with a picture insert.  More pictures can be added to the pocket.

This is the left angled flip page opened to reveal the pocket.

Waterfall on the back of the fourth page.  Inside of the back cover is a pocket for more picture inserts.

And there you have it.  If you need more information about this album, please contact the store email address or myself at donnamclean959@yahoo.ca
Until the next time, this is Donna wishing you a safe and happy week.
"If you're alone, I'll be your shadow.  If you want to cry, I'll be your shoulder.  If you want a hug, I'll be your pillow.  If you need to be happy, I'll be your smile.
But anytime you need a friend, I'll just be me."
HAPPY SCRAPPING!!!!

Tuesday, May 07, 2019

8 x 10 Pastel Mixed Media Spring Wood Box

Good morning everyone!!!  
I have a very pretty pastel layout on a box with some mixed media effects that I just completed.
This was made with lots of pretty Prima flowers and with spring in mind.


This is actually a wood box that I reversed and used the bottom of the box.  I first adhered a piece of water colour paper because I knew I was going to be using sprays and water.  The surface of the box is very shiny from the finish it was given and I knew that the sprays would not stay too well on the surface.  I then used an ivy stencil that was luckily the same size as the box and applied heavy modeling paste on the complete surface.  When the paste was completely dry I applied a good coat of  matte medium to prevent the sprays from soaking into the paper.  That way I got good coverage and I could move the sprays around with a paint brush.
When the medium was dry (only takes a couple of minutes - use a hair dryer or heat gun to speed things up), I took 3 cookie sticks and adhered them down the centre of the box.  I mixed up the length of them, one was higher, one was lower and the other in the middle.  I then made a mold of air dry clay, cut it in half and applied one to the right side of the sticks and the other, slightly lower, and to the left of the sticks.  Next was my sprays.  I sprayed a soft yellow around the entire centre of the box, not quite out to the outer edges.  For the darker green colour, I put some in a plastic dish, added water to dilute it down, then used a paint brush to go in and around the sticks and the clay pieces.  I did add some more after I added the frame and flowers, here and there,  around the outside edges of the flowers, not on the flowers.
Next I added a picture of a house that I found on a piece of patterned paper to the back of the frame.  I wanted the frame to stand out from the centre, so I cut a couple of pieces of chipboard, put them together and adhered it down to the back of the frame.  I adhered the resin frame onto the sticks in the centre.  I die cut some vines and added them around the centre section, one onto the upper sticks and lower sticks and then onto the clay molds.   The flowers were next, tucking some just under the edge of the frame and some onto the frame.  And lastly a vine coming out from under the flowers on the frame.  For extra accent I added some Nuvo crystal drops around the flowers.
Here are a few closeups.


"Spring makes its own statement, so loud and clear that the gardener seems to be 
only one of the instruments, not the composer."

Until next time, this is Donna wishing you a happy and safe day.
"HAPPY CRAFTING"

Monday, February 04, 2019

Art Journaling Book

Hello everyone!!!  I hope everyone has survived the extreme cold snap as of late.
Great time for scrapbooking.
Some time ago I posted my creation for the front of a journal book which I planned on creating pages for my "favourite quotes".  Well I finally completed the book and I am going to share it with you today.  I really enjoy doing books like this.  So far I have an "Old Age" book, a "Fairies" book, a "Pretty Faces" book and now my "Favourite Quotes" book.
I keep them in a cabinet in my family room and every once in a while I bring one out and set it on my table for other people to look through.

For the cover I used lots and lots of mixed media products - crackle paste, modeling paste with stencils, wood and metal shapes, and lots of Finnibair alchemy paints and mica powders.


 I have a total of 8 double pages using some scrap papers, Tim Holtz ephemera, metal embellishments, flowers, corrugated paper, modeling paste applied with stencils.  Lots and lots of items randomly selected and applied to the pages.  I simply selected items for each page and applied them.  It was fun and once I got started I couldn't stop.  I still plan on making more pages but will have to get another journal book to hold them.

First page.
The quote:  "When it hurts to look back, and you're afraid to look ahead, you can look beside you and your best friend will be there."  I felt the dog and the group of children was the best choice of ephemera for this quote.


Second page.  Paper collages were used on both sides.
The quote:  "Happiness is when what you think, what you say, and what you do are in harmony."


Third page.
The quote:  "Obstacles are those frightful things you see when you take your eyes off of your goals."


Fourth page.
The quote:  "Enjoy the little things for one day you may look back 
and realize they were the big things."


Fifth page.
The quote:  "Like branches on a tree, we may grow in different directions, 
yet our roots remain as one."


Sixth page.  Paper collages again for the background.
The quote:  "What lies behind us and what lies before us are tiny matters
compared to what lies within us."


Seventh page.
The quote:  "The happiness of your life depends on the quality of your thoughts."


Eighth page.
The quotes:  "Remember, today is the tomorrow you worried about yesterday."
"Great things are not done by impulse, but by a series of small things brought together."


And there you have it.  I have lots more favourite quotes to use and I hope to get started soon on the next pages.
Until next time, this is Donna wishing you a safe and prosperous week.
"HAPPY CRAFTING"
"Friends are like stars....you don't always see them, but you know they're always there."

Sunday, January 13, 2019

Hello everyone!!!  It has been a while since my last posting - I am back with a new canvas to start off the New Year.  This canvas is something a little different than what I normally do.


I decided to keep the background white.  I first applied a thick layer of modeling paste.   I first decided where I wanted to put my main embellishments in the centre of the canvas.  Then I  placed  some chipboard shapes from Prima around the centre of the canvas, painted them with white gesso.  Starting with the bird cage (just off to the right of the centre) I began adding the other pieces.  The scroll pieces at the top and bottom of the centre were made with air dry clay and using a Finnibair mold.  The circular pieces (one is in the centre of the bird cage) were also made with clay.  I added a few metal flowers, the wood bird and finally, Prima art stones.  Next was the sprays.  I started with Prima "fir needles" Colour Bloom spray at the top and spritzed with water to get it to flow into all the crevices.  I gradually worked my way down to the bottom.  I let this dry then started with the next colour  Prima's "dragon fly blue".  This one I sprayed around the outer edges and blended it with a brush.  Finally, I decided to add some yellow for accent and I chose Prima "sorbet" spray.  I sprayed this one here and there again using a bit of water and a brush to blend.  When everything was completely dried, I rubbed some gold wax onto the surface of the raised parts of most of the pieces.
Below is a couple of closeups.


Until next time, this is Donna wishing you a very Happy New Year.  I have lots of other things to share with in the near future.
"HAPPY SCRAPPING"
If you hear a voice inside of you say "you cannot paint,"
 then by all means paint, and that voice will be silenced.
Van Gogh

Sunday, September 16, 2018

Circular "By The Sea" Mixed Media Plaque

Good day everyone.  Today I want to share with you a 9" wood circle onto which I created a "By The Sea" scene.  I enjoy creating water scenes and using a lot of sea-like items.
I first started by painting white gesso onto the surface of the wood.  I followed with a coat of crackle paste from Golden.  I let the paste dry completely without help.  You get larger cracks when you do this.  You can help it along with a heat gun but expect to get smaller and less cracks.  It really does look like water.  I then applied a turquoise spray with a paint brush to get better control and then added some brown spray here and there for accent.
Below is the completed plaque.


  I applied a coat of matte medium to protect the surface when the sprays had completely dried.  I did not want the crackle paste to flake off.


I then added my other items starting with a piece of cheesecloth on the left side of the resin frame.  I added a large shell to the centre of the frame.  On the frame I painted on some of the turquoise background spray here and there and then some bronze paint here and there for accent.
On the right of the frame I adhered some fish netting and placed another piece of cheesecloth to the upper edge of the netting by tucking it underneath.
The rest is shells, flowers, greenery, broken turquoise tiles, and art stones.  When done I added some more of the spray here and there around all the elements.  Below is some close-ups of sections of the plaque.


And there you have it.  I hope you enjoyed this tutorial and will give it a try.
Until next time, this is Donna wishing you a safe and crafty week.
"If you do not change what you are doing today, your tomorrow will be no different than yesterday."
"HAPPY SCRAPPING"

Saturday, August 18, 2018

8 1/2" x 5 1/2" Vertical Album

Good Day everyone!!!
I have become very obsessed with making mini albums lately.   I find that you can make them very unique and can be used for those very special pictures.  They can be time-consuming but I feel that the end product is very satisfying.  So today, I am going to share with you one of my albums.  I decided to do this one so that it opens vertically so that the pages flip from bottom to top.
I have covered the cover (front and back and spine) with a fabric rather than paper.  Here is the album starting with the front cover and a side view.


For each page I used the Prima "You and Me" paper collection.  Lots of embellishments: flowers, decorative chipboard pieces from the You and Me Collection.  Each page has two parts.  The upper part has a 4 1/4" x 4 1/4" flip out section.  You can add two 4x4 pictures inside.  The lower part has a second flip up section which is 6 1/4" x 4 1/4".  You can add two 4x6 pictures on the inside.  There is a total of 3 inside pages keeping in mind that the inside of the front and back covers are part of the pages as well as the backs of each page.  There is a total of 8 flip out sections for a total of 16 pictures.  I won't go into too much description as to how I did each page.  That would be a very long posting.  There is a picture of each top and bottom sections so I hope you can see how I did each section.  A lot of paper collages were used on the fronts of each picture flip out.

Page 1 (inside of the front cover and the bottom section)


Page 2 top and bottom


Page 3 Top

Page 3 Bottom


Page 4 Top

Page 4 Bottom (inside of back cover)


A view of open flip outs.


I will be showing several other mini albums that I have been working on.  All covered in fabric and using Prima papers and embellishments.
Until next time, this is Donna wishing you a safe and fun weekend.
"HAPPY SCRAPPING"
"Be who you are and say what you feel because those who mind don't matter
 and those who matter don' t mind"
Dr. Seuss

Saturday, July 14, 2018

"Choose Kindness" Pastel 9x12 Canvas

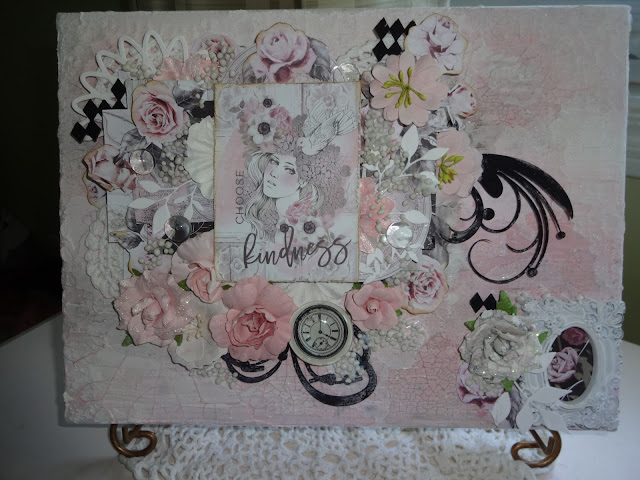
Good morning ladies.  Today is the reveal of my 9x12 canvas that I have created.  I call it "Choose Kindness" which is the beautiful quote block cut from the Rose Quartz paper collection from Prima.  This is gorgeous paper.  I took one of the papers and cut out all the flower bunches.  It was a bit time-consuming but I do enjoy doing that type of thing.  I actually do that to some of my very old papers.  I cut out all the flowers and place them in a plastic bag and keep them with all my other ephemera.  I have been able to use a lot of the cut items on several layouts, etc.
The canvas.


To start (unfortunately my picture did not turn out) I put together a paper collage to fit behind the quote block.  I used pop dots for each paper so that I could tuck things under the edges of each of the three layers.  You can see the papers coming out from each side of the block.   I laid the collage down on the canvas and lightly marked where I wanted it to be placed.  This was for the application of the crackle paste and the sprays.  Not much sense in applying these items if they won't be showing because they are under the paper collage. I set this aside.
For the canvas surface, I applied a generous amount of white gesso over the entire surface.  After drying completely, I applied Golden crackle paste mainly around the outside edges and up to my marks for my paper collage.  It is important to let this paste dry on its own to get maximum cracks.  This could take a couple of hours. I then sprayed with a pretty pink spray from Shimmerz called Pop Art Pink.  Here is a close-up to show the cracks.


I then added my quote block using pop dots to the centre of the collage and added the collage to the canvas, not quite centred, more to the left side.  I did use pop dots to raise the entire piece.
I began tucking and adding all the flower bunches I cut out making sure that they were coming out from the layers of the paper collage.  And then the rest of my embellishments - pink and white flowers, flowers from the Rose Quartz collection,  a cut piece of an old doilie (at the left outside edge of the collage and at the top left corner), die cut white vines, chipboard flourishes and diamond shaped chipboard pieces painted with black paint and then art stones.  I also added a section at the bottom right corner of the canvas using a white resin decorative frame.  Here are a few close-ups of sections of the canvas.


And there you have it.  I was hesitant at first with the black accents, but I am glad I used them as they really pop the whole design.
I hope you have enjoyed my latest creation.  Until next time this is Donna wishing you a safe, prosperous, happy, delightful, creative and memory-filled week.
"HAPPY SCRAPPING"
"My husband said it was him or the stamps.  I'll miss him."